
One of the most versatile triggers I love to use in Power Automate is the built-in “When a HTTP request is received” trigger. This trigger exposes a manually callable endpoint that can handle inbound requests over HTTPS. The endpoint URL named HTTP POST URL, is auto-generated upon initial save of the flow. The generated URL is quite long which includes query parameters that specify the Shared Access Signature key with a logic app domain that is randomly assigned according to your tenant’s region. Ok, let’s call it what it is, it’s not a user-friendly URL and dealing with many of them can be quite confusing as it’s not very descriptive. To make matters worse, it cannot be edited or changed! This is where Azure API Management comes to the rescue 😎
Here is what we are going to cover in this post:
- Discuss the benefits of using the Azure API Management
- Discuss the general structure of the API and its operations
- Manual walkthrough of the steps required to configure the trigger endpoints in APIM
- PowerShell script to automate the configuration
- Execute PowerShell script in Azure DevOps
How can Azure API Management Help?
The benefits of using Azure API Management (APIM) in this context is manyfold. To list some:
- It allows management of the flow endpoints as APIs and it allows configuration of security, policy and documentation for each endpoint it exposes
- It abstracts away the complexity of the URLs and hosts them under the same domain
- The flow endpoints can be organised and structured in a more API-oriented way
- It simplifies and supports the lifecycle of the APIs by allowing revisions and versions
- And many more…
If you want to know more about Azure API Management then visit Microsoft’s official docs here.
General Structure of the API and its Operations
Let’s begin with setting up some flows. I have set up two simple flows with the HTTP Request trigger in my Power Apps environment:

To keep things simple, the general structure of the flow is as follows:

The trigger details for Send Requests for Contacts:
| HTTP POST URL | https://prod-21.australiasoutheast.logic.azure.com:443/workflows/<guid>/triggers/manual/paths/invoke?api-version=2016-06-01&sp=%2Ftriggers%2Fmanual%2Frun&sv=1.0&sig=<signature-key> |
| Sample JSON Payload | { name: “John Smith” } |
The trigger details for Send Requests for Accounts:
| HTTP POST URL | https://prod-03.australiasoutheast.logic.azure.com:443/workflows/<guid>/triggers/manual/paths/invoke?api-version=2016-06-01&sp=%2Ftriggers%2Fmanual%2Frun&sv=1.0&sig=<signature-key> |
| Sample JSON Payload | { “formId”: “guidValue”, “submittedByEmail”: “test@contoso.com” } |
The resulting structure I want to achieve for the API URI is to have a single endpoint, demo-flows, to group the underlying resources and controllers:
<APIM gateway URL>/demo-flows/contacts/sendrequests
<APIM gateway URL>/demo-flows/accounts/submitform
The idea of grouping the flow endpoints this way is to expose them as a single API in Azure API Management. This allows operations of the endpoints to be feature-grouped so that they are governed and exposed through one API. This may not adhere to the best practice of RESTful API design but due to the resulting action of the flow endpoints being a controller, we are going to structure it this way.
Manual Steps to Configure the Trigger Endpoints in APIM
I won’t be covering in detail how to set up the Azure API management resource instance. You can create one using the steps provided here.
To add a new API, first navigate to the APIM instance created in Azure Portal, found under the APIs > APIs, click + Add API and select Blank API:
Side note: Through the Azure Portal, APIM allows adding new APIs via OpenAPI, WADL, WSDL specifications, to name a few, but it also allows creation of API directly from Logic Apps. This is interesting as flows essentially run on top of Logic App 🤔. Currently there is no way to add flows directly from this UI, understandably. When a API is created from a Logic App, it has a one-to-one relationship between the Logic App and the API in the APIM which is not the resulting API structure we want to achieve.
On the Create a Blank API dialog, select Full option at the top and populate the highlighted fields and click Create:
For now, I’m going to add only one flow endpoint to demonstrate the structure. Under Demo Flows API, click + Add operation:

In the Frontend section, populate the following fields:

Under the Request tab, specify the representation of the request:

Under the Responses tab, specify the possible response status and click Save:

Note: The configuration of the operation has been deliberately kept simple for demo purposes. There are more things you can do under each of the tabs to design and document the schema of the operation.
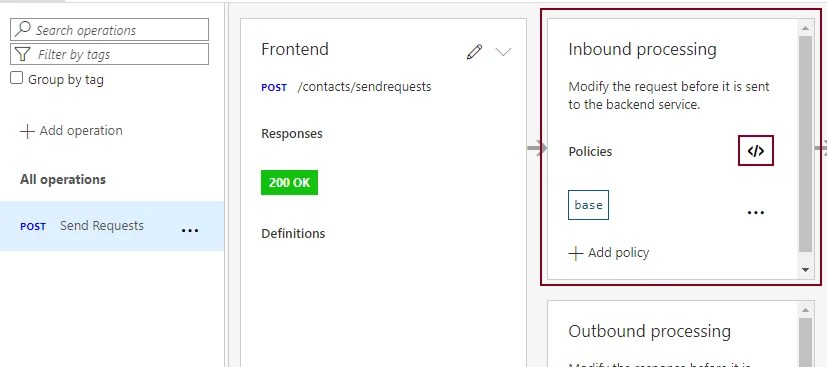
So far we have defined how we are going to request the API endpoint, now we are going to configure the policies that change the behaviour of the incoming request before forwarding the request to the backend API. We are going to do this by declaring the policy statements under the inbound processing.
Under the Inbound processing, click on the </> button:
Currently, we call the endpoint using the friendly URI we’ve configured in Frontend:
https://<APIM gateway URL>/demo-flows/contacts/sendrequests. We would like to map this to our flow endpoint:
https://prod-21.australiasoutheast.logic.azure.com:443/workflows/<guid>/triggers/manual/paths/invoke?api-version=2016-06-01&sp=%2Ftriggers%2Fmanual%2Frun&sv=1.0&sig=<signature-key>So in our policies XML, under inbound section, declare the following policy statements:
<policies>
<inbound>
<base />
<set-backend-service base-url="https://prod-21.australiasoutheast.logic.azure.com:443/workflows/<guid>/triggers" />
<rewrite-uri template="/manual/paths/invoke?api-version=2016-06-01&sp=/triggers/manual/run&sv=1.0&sig=<signature-key>" />
<set-header name="Ocp-Apim-Subscription-Key" exists-action="delete" />
</inbound>
<backend>
<base />
</backend>
<outbound>
<base />
</outbound>
<on-error>
<base />
</on-error>
</policies>
set-backend-service– By declaring this policy here, it allows the backend service endpoint to be set at the operation levelset-header– This removes the APIM subscription key from the header of the request and won’t be forwarded to the backend servicerewrite-uri– This policy converts the requested URL in its public (friendly) form to the path required by the backend service

Note: It is important to point out that these policies are applied and executed sequentially therefore the order in which they are positioned is crucial.
To test the API, simply navigate to Test tab on the Send Requests operation and enter something meaningful in the request body and click Send:

You can also call this API from your favourite API client tool, such as Postman, by passing in the subscription key in the header (i.e. Ocp-Apim-Subscription-Key) when calling the API.
PowerShell Script to Automate the Configuration
Setting up the APIs manually on the APIM via Azure Portal is OK for development purposes, however, if we need to deploy the APIs downstream to UAT and PROD environments then we need an automated way to do this. There are a couple of ways to CI/CD APIs from one APIM instance to the other:
- Using ARM templates
- Using PowerShell scripts
To keep things fairly “lite” for the proof-of-concept, I decided to explore PowerShell scripts utilising the Az module cmdlets for API Management. This script will be executed as a task in the Azure DevOps release pipeline.
In order to specify the deployable API definitions along with the operations and the policies in one place, I’ve decided to come up with my own JSON payload as an input to the script. There is lots of room to improve on and extend this structure but it provides a good initial starting point to deploy the flow endpoints.
There are two things I want to point out in the JSON payload:
#{variable-name}#– this is a placeholder to be replaced with the actual variables with the specified name configured in Azure DevOps."policy" : "operation-name-policy.xml"– Each operation’s policies are defined in its own XML file.
I have all the policy files defined under a folder called policies. The XML file contains the policy statements as follows:
Similar to the definitions.json file, we will be replacing the placeholder values with actual values when executing the pipeline.
The main script is declared in apim.ps1:
The helper functions are declared in apim-functions.psm1:
Execute PowerShell Script in Azure DevOps
With no other build artifacts to be staged, I’ve created an Azure DevOps release pipeline to source the artifacts directly from the GitHub repository. Two stages have been set up for release into Dev and UAT:

For each stage, I’ve linked a variable group with values that apply to the target release environment. Notice the placeholder variable names in definitions.json and policy XML files match to what is defined here:

Each stage has the same tasks configured:

Replace Tokens Task – replaces the tokens in definitions.json and policy XML files (read usage here)

Azure PowerShell Task – executes the apim.ps1 script

Now with all that prepared, when you run the release pipeline it will deploy the flow endpoints into APIM DEV and UAT instances!
There are so many things which I haven’t covered here, such as securing the endpoints, products and subscriptions, revisions and versioning, using ARM templates, etc. Hopefully, I’ll have the opportunity to cover some of these topics in detail in the future as I uncover them. As I was telling a friend, I’m only dealing with the sandfly whilst a mammoth is in the room!
Hope you enjoyed the post, let me know your thoughts in the comments below or any of my contact channels 😊


